Programs in Open C to Rotate an Image Continuously
Image editing has become more and more popular these days as mobile phones have this built-in capability that lets you crop, rotate and do more with your images.
In this post, we will explore and learn about these image editing techniques. Specifically, we will learn how to:
- Rotate an image
- Translate or shift the image content
Basic Image Transforming Operations
Rotation and translation of images are among the most basic operations in image editing. Both fall under the broader class of Affine transformations. Before studying more complex transformations, you should therefore first learn to rotate and translate an image, using the functions available in OpenCV. Check out the image below, we will be using it in all our transformation examples here.

- Image Rotation using OpenCV
- Translation of Images using OpenCV
- Interesting Applications
- Web Application using Streamlit
- Summary
Let's start by taking a look at the code below that will be used to perform image rotation using OpenCV. In the remainder of this post, we will discuss each line in detail, along with the translation of images as well. By the end of this post, you will have a good understanding of the code shown below.
Python:
import cv2 # Reading the image image = cv2.imread('image.jpg') # dividing height and width by 2 to get the center of the image height, width = image.shape[:2] # get the center coordinates of the image to create the 2D rotation matrix center = (width/2, height/2) # using cv2.getRotationMatrix2D() to get the rotation matrix rotate_matrix = cv2.getRotationMatrix2D(center=center, angle=45, scale=1) # rotate the image using cv2.warpAffine rotated_image = cv2.warpAffine(src=image, M=rotate_matrix, dsize=(width, height)) cv2.imshow('Original image', image) cv2.imshow('Rotated image', rotated_image) # wait indefinitely, press any key on keyboard to exit cv2.waitKey(0) # save the rotated image to disk cv2.imwrite('rotated_image.jpg', rotated_image) C++:
#include <iostream> #include<opencv2/opencv.hpp> using namespace cv; int main(int, char**) { Mat image = imread("image.jpg"); imshow("image", image); waitKey(0); double angle = 45; // get the center coordinates of the image to create the 2D rotation matrix Point2f center((image.cols - 1) / 2.0, (image.rows - 1) / 2.0); // using getRotationMatrix2D() to get the rotation matrix Mat rotation_matix = getRotationMatrix2D(center, angle, 1.0); // we will save the resulting image in rotated_image matrix Mat rotated_image; // rotate the image using warpAffine warpAffine(image, rotated_image, rotation_matix, image.size()); imshow("Rotated image", rotated_image); // wait indefinitely, press any key on keyboard to exit waitKey(0); // save the rotated image to disk imwrite("rotated_im.jpg", rotated_image); return 0; }  – LearnOpenCV")
I've partnered exclusively with OpenCV.org to bring you official courses in AI, Computer Vision, and Deep Learning to take you on a structured path from first steps to mastery.
Image Rotation using OpenCV
You can rotate an image by a certain angle  by defining a transformation matrix
  . This matrix is usually of the form:
(1) 
OpenCV provides the ability to define the center of rotation for the image and a scale factor to resize the image as well. In that case, the transformation matrix gets modified.
(2) 
In the above matrix:
(3) 
where  &
&  are the coordinates along which the image is rotated.
OpenCV provides the getRotationMatrix2D() function to create the above transformation matrix.
The following is the syntax for creating the 2D rotation matrix:
getRotationMatrix2D(center, angle, scale)
The getRotationMatrix2D() function takes the following arguments:
-
center: the center of rotation for the input image -
angle: the angle of rotation in degrees -
scale: an isotropic scale factor which scales the image up or down according to the value provided
If the angle is positive, the image gets rotated in the counter-clockwise direction. If you want to rotate the image clockwise by the same amount, then the angle needs to be negative.
Rotation is a three-step operation:
- First, you need to get the center of rotation. This typically is the center of the image you are trying to rotate.
- Next, create the 2D-rotation matrix. OpenCV provides the
getRotationMatrix2D()function that we discussed above. - Finally, apply the affine transformation to the image, using the rotation matrix you created in the previous step. The
warpAffine()function in OpenCV does the job.
The warpAffine() function applies an affine transformation to the image. After applying affine transformation, all the parallel lines in the original image will remain parallel in the output image as well.
The complete syntax for warpAffine() is given below:
warpAffine(src, M, dsize[, dst[, flags[, borderMode[, borderValue]]]])
The following are the arguments of the function:
-
src: the source mage -
M: the transformation matrix -
dsize: size of the output image -
dst: the output image -
flags: combination of interpolation methods such as INTER_LINEAR or INTER_NEAREST -
borderMode: the pixel extrapolation method -
borderValue: the value to be used in case of a constant border, has a default value of 0
Note: You can learn more about OpenCV affine transformations here
Okay, now that you know the code and the functions, let's take a concrete example and try doing it, using OpenCV. Start by importing the OpenCV library and reading an image.
Python
import cv2 # Reading the image image = cv2.imread('image.jpg') Download Code To easily follow along this tutorial, please download code by clicking on the button below. It's FREE!
Note: All the C++ code after the include statements are inside the main() function.
C++
#include "opencv2/opencv.hpp" using namespace cv; # Reading the image Mat image = imread("image.jpg"); Next, compute the rotation point, which in this example, will be the center of the image. To do this, simply divide the image width and height by two, as shown below.
Python
# Dividing height and width by 2 to get the center of the image height, width = image.shape[:2] center = (width/2, height/2) C++
// get the center coordinates of the image to create the 2D rotation matrix Point2f center((image.cols - 1) / 2.0, (image.rows - 1) / 2.0); Once you have the pixel coordinates of the center of the image, compute a rotation matrix, using the function getRotationMatrix2D(), as shown below. This function takes as input:
- the center point, about which the rotation occurs
- the angle of rotation, in degrees (positive values, corresponding to counter clockwise rotation)
- an isotropic scale factor to resize the image. This can be a floating point value. For example, a value of 1.0 will keep the output image the same size as the source image. And a value of 2.0 will make the resulting image double the size of the source image
The function returns the 2D-rotation matrix, which will be used in the next step to rotate the image.
Python
# the above center is the center of rotation axis # use cv2.getRotationMatrix2D() to get the rotation matrix rotate_matrix = cv2.getRotationMatrix2D(center=center, angle=45, scale=1) C++
// create the rotation matrix using the image center Mat rotation_matix = getRotationMatrix2D(center, angle=45, 1.0); Now, apply the computed rotation matrix to the image, using the warpAffine() function. It requires three inputs:
- the source image
- the rotation matrix
- the size of the output image
The rotated image is then stored in rotated_image which we will display below.
Python
# Rotate the image using cv2.warpAffine rotated_image = cv2.warpAffine(src=image, M=rotate_matrix, dsize=(width, height)) C++
// we will save the resulting image in rotated_image matrix Mat rotated_image; // apply affine transformation to the original image using the 2D rotation matrix warpAffine(image, rotated_image, rotation_matix, image.size()); Now, display the rotated image, using the imshow() function.
Python
# visualize the original and the rotated image cv2.imshow('Original image', image) cv2.imshow('Rotated image', rotated_image) # wait indefinitely, press any key on keyboard to exit cv2.waitKey(0) # write the output, the rotated image to disk cv2.imwrite('rotated_image.jpg', rotated_image) C++
imshow("Rotated image", rotated_image); waitKey(0); // save the rotated image to disk imwrite("rotated_im.jpg", rotated_image); 
Translation of Images using OpenCV
In computer vision, translation of an image means shifting it by a specified number of pixels, along the x and y axes. Let the pixels by which the image needs to shifted be tx and ty. Then you can define a translation matrix :
(4) 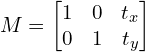
Now, there are a few points you should keep in mind while shifting the image by tx and ty values.
- Providing positive values for
txwill shift the image to right and negative values will shift the image to the left. - Similarly, positive values of
tywill shift the image down while negative values will shift the image up.
Follow these steps to translate an image, using OpenCV:
- First, read the image and obtain its width and height.
- Next, like you did for rotation, create a transformation matrix, which is a 2D array. This matrix contains the information needed to shift the image, along the x and y axes.
- Again, as in rotation, use the
warpAffine()function, in this final step, to apply the affine transformation.
Go through this code and see for yourself how simple it is:.
Python
import cv2 import numpy as np # read the image image = cv2.imread('image.jpg') # get the width and height of the image height, width = image.shape[:2] C++
#include "opencv2/opencv.hpp" using namespace cv // read the image Mat image = imread("image.jpg"); // get the height and width of the image int height = image.cols; int width = image.rows; In the above code block, you read the image and get its height and width.
Next, you create the translation matrix.
Python
# get tx and ty values for translation # you can specify any value of your choice tx, ty = width / 4, height / 4 # create the translation matrix using tx and ty, it is a NumPy array translation_matrix = np.array([ [1, 0, tx], [0, 1, ty] ], dtype=np.float32) C++
// get tx and ty values for translation float tx = float(width) / 4; float ty = float(height) / 4; // create the translation matrix using tx and ty float warp_values[] = { 1.0, 0.0, tx, 0.0, 1.0, ty }; Mat translation_matrix = Mat(2, 3, CV_32F, warp_values); For the translation matrix, as discussed above, you will need tx and ty. In this example, you are taking a quarter of the width and height, as the translation values. We recommend you try out different values and study their output.
Now, apply the translation matrix to the image, using the warpAffine() function, same as you did for rotation.
Python
# apply the translation to the image translated_image = cv2.warpAffine(src=image, M=translation_matrix, dsize=(width, height)) C++
// save the resulting image in translated_image matrix Mat translated_image; // apply affine transformation to the original image using the translation matrix warpAffine(image, translated_image, translation_matrix, image.size()); Note: warpAffine() is a general function that can be used to apply any type of affine transformation to an image. Just define the matrix M appropriately.
This final block of code will visualize the translated image and write it to the disk. And you're done!
Python
# display the original and the Translated images cv2.imshow('Translated image', translated_image) cv2.imshow('Original image', image) cv2.waitKey(0) # save the translated image to disk cv2.imwrite('translated_image.jpg', translated_image) C++
//display the original and the Translated images imshow("Translated image", translated_image); imshow("Original image", image); waitKey(0); // save the translated image to disk imwrite("translated_image.jpg", translated_image); The following figure shows the resulting translated image.

Interesting Applications
Want to build this application that takes a bird's eye view of a scene? Well, acquire some information on OpenCV's perspective transform. Add it to all you have already learnt here about transformations. And go build that app!
We also recommended taking a look at this tutorial here to learn more about affine transformations.
Web Application using Streamlit
We have created a simple web application that you can explore here that allows you to rotate and translate images.
Summary
In this post you learned about image rotation and translation operations using OpenCV. We started with the rotation of images using OpenCV where we used the getRotationMatrix2D() function to obtain a 2D rotation matrix. We then passed this rotation matrix to the warpAffine() function to rotate the image about its center point by the desired angle.
Next you learned about translating images using OpenCV. For this, we explicitly defined a translation matrix which contained the x and y values by which we wanted to translate the image. For translation, we also used the warpAffine() function to apply the transformation.
Rotation and translation of images are among the most basic geometric transformations that can be performed and will provide a nice foundation for learning about other transformations that can be performed using OpenCV. We encourage you to experiment with these examples by changing the inputs and viewing the results.
You can find all the code discussed in this post at this link → Image rotation and translation colab notebook
Subscribe & Download Code
If you liked this article and would like to download code (C++ and Python) and example images used in this post, please click here. Alternately, sign up to receive a free Computer Vision Resource Guide. In our newsletter, we share OpenCV tutorials and examples written in C++/Python, and Computer Vision and Machine Learning algorithms and news.
Source: https://learnopencv.com/image-rotation-and-translation-using-opencv/
0 Response to "Programs in Open C to Rotate an Image Continuously"
Post a Comment